how-to-fido
How to FIDO
Employing FIDO authenticators and the WebAuthn API in your sign-in flows: A guide for relying parties
Let’s Define Some Terms
-
Account Bootstrapping: “Bootstrapping an account on a device”, or “bootstrap sign-in”.
Starting from scratch [1], a relying party authenticates a user. For example, this happens when a user puts their existing account on a newly-purchased phone. Or when a user logs into a website for the first time in a given browser instance. Or when a user logs into a website in a private browsing session (which doesn’t have cookies and other state from the main browsing session). Or when a user signs into a mobile app for the first time on a given device. Note that this is different from creating an account with a service in the first place. -
Reauthentication happens when a relying party already knows who the user is, but would like to reconfirm this. For example, this happens before making sensitive changes to an account (add a recovery email address, change the passwords, etc.): a relying party would typically ask the user to re-enter their password or perform some other action to reconfirm their control of the session. Likewise, when a mobile app asks the user to sign in every time the app starts (or a web site asks the user to sign in again after a period of inactivity), this is technically a reauthentication, since the app or web site can choose to remember the user’s authentication state after the account has been bootstrapped on the device, e.g., by setting cookies.
-
Relying Party (RP): The website that is trying to ascertain the identity of the user or perform FIDO authentication.
-
Signing in: This can refer to either account bootstrapping or reauthentication. When in doubt, we will use the latter, more descriptive, terms in the sections below.
-
Logging in: see Signing in.
-
Login challenge: A prompt served to the user that they need to pass. For example, a prompt asking the user for their password is a login challenge. A prompt asking the user to confirm sign-in on another device (e.g., their phone) is a login challenge. A prompt asking the user to insert and activate their security key is a login challenge. Account bootstrapping and reauthentication usually consist of serving the user one or more login challenges.
-
Authentication factor: Information provided by a user (or one of the user’s devices) for purposes of authentication, usually in response to a login challenge. Often categorized into “knowledge factors” (e.g. passwords), “something you have” factors (e.g. another already signed-in device), and “something you are” factors (e.g. biometrics). Note that a single login challenge may collect multiple factors simultaneously.
-
2FA: 2-factor authentication (aka MFA: multi-factor authentication). This refers to a contract between a user and a relying party where the relying party must collect at least two distinct authentication factors from the user during a bootstrap sign-in.
-
2FA user: a user whose account has 2FA turned on, i.e., who must present 2 authentication factors during sign-in.
-
Roaming authenticator: a FIDO authenticator usable with any device the user is trying to sign-in from. Roaming authenticators attach to users’ devices in varying fashions. For example: via USB, NFC, or Bluetooth. These authenticators are often referred to as “Security Keys”. A smartphone can also act as a roaming authenticator.
-
Platform authenticator: a FIDO authenticator that is built-into a user’s device.
-
UVRA: User-verifying roaming authenticator. UVRAs can verify [2] individual users through the use of biometrics, or through the user typing a PIN or password, etc. An important class of UVRAs are smartphones, in which case the “attachment” typically happens over a wireless connection.
Table of Contents
- 1 Overview
- 2 Bootstrapping an Account
- 3 Performing FIDO-based Reauthentication
- 4 Phishing-resistant 2nd Factors
- 5 User-Verifying Roaming Authenticators (UVRAs)
- 6 Account Recovery / Device Loss
- 7 Appendix: More Complex Use Cases
- 8 Footnotes
1 Overview
It’s important to understand that different types of authenticators unlock different use cases and user experiences. The webauthn/FIDO APIs support these different use cases, but relying parties must take care to utilize the APIs correctly, e.g., by requesting the appropriate transport or attachment type for the particular use case they are addressing. If not done correctly, you risk confusing your users, making authentication more complicated than necessary for them, or locking them out of their account. Below is an overview of the use cases unlocked by the different types of authenticators:
| Physical manifestation of the authenticator | ||||
|---|---|---|---|---|
| Platform | Roaming | |||
| Capabilities of authenticator | User-verifying |
|
|
|
| Not-user-verifying |
|
|
||
Below we will get into more detail of how relying parties should implement support for these different use cases, but we will approach this from a user-journey perspective: what should you (as the relying party) do during the login step, during the reauthentication step, etc.
2 Bootstrapping an Account
2.1 Authenticating the User
This section applies when the relying party doesn’t know yet who is controlling the client device. There is no cookie, no credential id, etc., available to the relying party, although for now we assume that the user already has an existing account with the relying party.
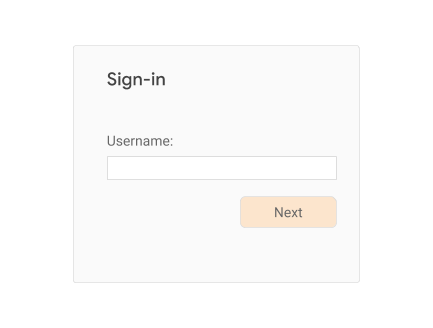
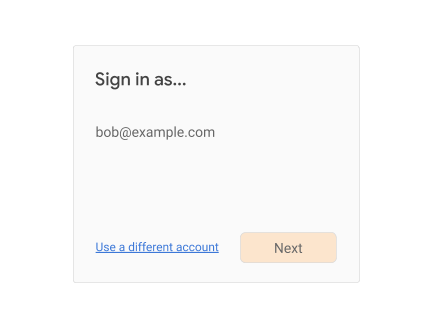
To bootstrap an account on a device, serve the user a sign-in page. Typically you would start off by asking the user for their account identifier (username) [6]:
Once it’s clear who the user claims to be, appropriately serve further login challenges to the user. This may or may not include asking the user for their password, and may or may not include serving FIDO challenges for 2FA users (see below for how to use FIDO for 2FA). This may even include “account recovery” steps in case the user has forgotten their password or is otherwise not able to pass the regular login challenges. Once the user has passed all the login challenges, they’re considered authenticated and signed in.
What happens when the user doesn’t already have an account with the relying party? Usually, you will give users the option on the sign-in page to create an account [7]. If the user chooses that option, collect the necessary information from the user to open a new account. If the user successfully opens a new account, they’re also considered authenticated and sign-in.
Once the user is signed in (either because they bootstrapped their account on the device by passing one or more login challenges, or because they just created a new account at the relying party), make a call to:
PublicKeyCredential.isUserVerifyingPlatformAuthenticatorAvailable()
If that call returns true, then the user’s system features a FIDO platform authenticator, and you can offer the user the convenience of using FIDO-based reauthentication in the future:
2.2 Opting into FIDO-based Reauthentication
Serve an opt-in page to the user offering biometric reauthentication:
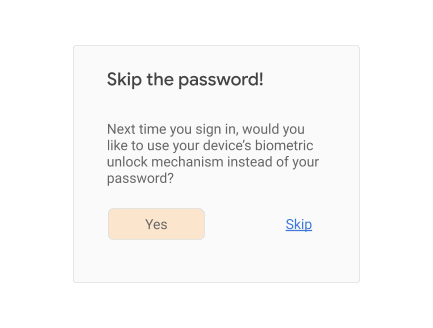
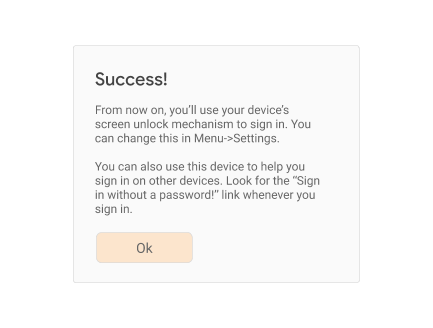
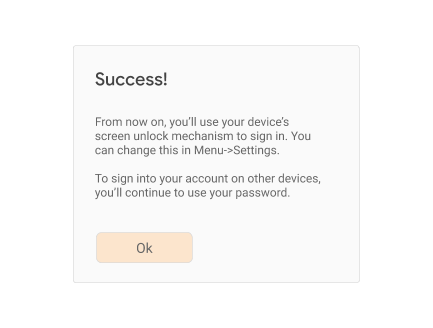
Consider showing (or linking to) longer descriptions explaining that all users that are able to unlock the current device will be able to access the account at the relying party to ensure that the user is giving fully informed consent.
If the user consents, call navigator.credentials.create(), making sure
to ask for a platform authenticator and user verification:
navigator.credentials.create({
  publicKey: {
    rp: {...},
    user: {...},
    challenge: ...,
    pubKeyCredParams: {
      type: "public-key",
      alg: -7
    },
    authenticatorSelection: {
      authenticatorAttachment: "platform", // !!!
      userVerification: "required"         // !!!
    },
  }
})
A note on attestation: We recommend that most relying parties operating in the consumer (as opposed to enterprise) space not specify the attestation conveyance parameter
attestation(thus defaulting to none), or instead explicitly use the valueindirect. This guarantees the most streamlined user experience (platforms are likely to obtain consent from the user for other types of attestation conveyances, which likely results in a larger fraction of unsuccessful credential creations due to users canceling the creation).
Associate the returned public key and credential id with the user account. Also, make sure you associate the credential id with the device the user just authenticated from. For example, store the credential id in a cookie (or associate it with a cookie), or store the credential id in local storage.
3 Performing FIDO-based Reauthentication
Reauthentication might happen for the following reasons:
-
The user signed out and now wants to sign in again.
-
The user session expired due to inactivity, and the user wants to sign in again.
-
The user is about to perform a sensitive action, and needs to re-confirm control over the user session.
Let’s look at the last case first: when it’s time to re-authenticate for a sensitive action, check whether you have a credential id for this user for the purpose of reauthentication, i.e., the kind of credential id obtained from opting the user into FIDO-based reauthentication. Make sure it’s associated with the user and device - for example, check a cookie or read from local storage.
If no credential id is available, serve a traditional login challenge suitable for reauthentication [8], for example:
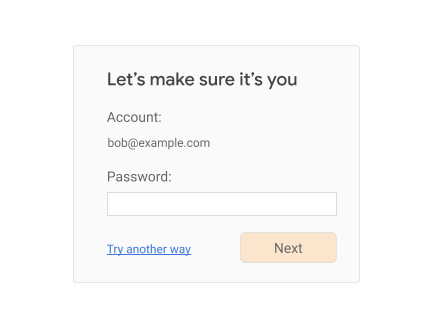
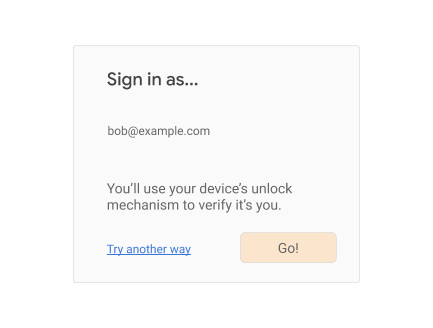
If, however, you do discover a credential id for the current session, then you can use FIDO-based reauthentication:
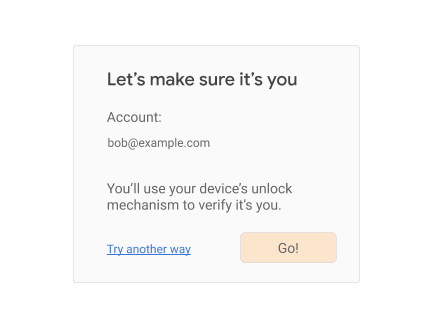
When the user is ready (in the above example, when they click on the
“Go!” button), call navigator.credentials.get(), again requiring user
verification and specifying an “internal” transport:
navigator.credentials.get({
  publicKey: {
    challenge: ...,
    rpId: ...,
    allowCredentials: [{
      type: “public-key”,
      id: ..., //!!! use the *one* credential id associated with
               //!!! this user/device combination.
      transports: [“internal”]    //!!!
    }],
    userVerification: “required”, //!!!
  }
})
If the user instead clicks on “Try another way”, you should offer them other login challenges (password, etc.) to reauthenticate them.
Now let’s look at the case where the reauthentication is triggered because the user logged themselves out, or the relying party expired the user session. To facilitate this, the relying party would have to keep some form of secure user session state (unforgeable cookie, etc.) even when they consider the user signed-out, [9] allowing it to give the user a more convenient user experience. You, as the relying party, might serve a sign-in page like this:
(An alternative UI treatment here could be an account chooser-style UI, especially when the relying party allows multiple accounts to be signed-in at the same time.)
If the user clicks on “Use a different account”, then you should enter an account bootstrap flow as explained above, repeating the steps in Authenticating the User and Opting into FIDO-based Reauthentication, presumably with a different account. In this case, you should also give the user the ability to completely remove their account from being listed on the sign-in page.
If the user clicks on “Next”, then check whether you have a credential id associated with the user and device (for example, check a cookie or read from local storage). If no credential id is available, serve a traditional login challenge suitable for reauthentication, for example:
If, however, you do find a credential id for the current session, then you can use FIDO-based reauthentication:
When the user is ready (in the above example, when they click on the “Go!” button), call navigator.credentials.get(), again requiring user verification and specifying an “internal” transport:
navigator.credentials.get({
  publicKey: {
    challenge: ...,
    rpId: ...,
    allowCredentials: [{
      type: “public-key”,
      id: ..., //!!! use the *one* credential id associated with
               //!!! this user/device combination.
      transports: [“internal”]    //!!!
    }],
    userVerification: “required”, //!!!
  }
})
If the user instead clicks on “Try another way”, you should offer them other login challenges (password, etc.) to reauthenticate them.
4 Phishing-resistant 2nd Factors
The login flows shown above don’t fundamentally change the security posture of your user accounts. If, for example, your account bootstrap flow consists of asking the user for only a username and password, then opting them into FIDO-based reauthentication (as shown above), still leaves the user vulnerable to phishing attacks. Using user-verifying platform authenticators for reauthentication is simply a way to make reauthentication easier to use, it’s not a way to make the account resistant to phishing attacks.
To actually reduce the exposure of your users to certain phishing risks, you can offer them the ability to use FIDO-based roaming authenticators as 2nd factors when bootstrapping their account. [10]
Note: We do not recommend allowing users to register user-verifying platform authenticators as second factors for account bootstrapping. If you want to give your users the convenience of biometric sign-in, follow the steps above to register a user-verifying platform authenticator as a password replacement for reauthentication, not as a second factor for account bootstrapping.
This is ok to do even for your 2FA users, who might expect two different login challenges for a sign-in-after-sign-out reauthentication: the platform authenticator represents something the user has, and it will verify something the user knows (PIN) or is (biometric).
4.1 Opting into FIDO-based 2FA
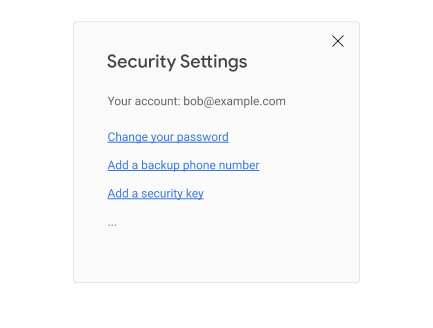
Have your users register their roaming authenticators on a page that they normally use for security purposes such as 2FA sign-up, password changes, etc. In particular, we do not recommend in-lining this opt-in choice as part of the user’s sign-in flow, unless your site makes 2FA mandatory [11].
Typically, you would have a page like this:
When the user clicks on “Add a security key”, you call
navigator.credentials.create(), taking care to specify “cross-platform”
for the attachment type. You should also look up any existing credential
ids for 2FA authenticators already registered for the current user (you
can ignore credential ids for platform authenticators), and specify
those in the exclude-list, thus ensuring that a user doesn’t register
the same authenticator twice:
navigator.credentials.create({
  publicKey: {
    rp: {...},
    user: {...},
    challenge: ...,
    pubKeyCredParams: {
      type: "public-key",
      alg: -7
    },
    excludeCredentials: [{ //!!! Credentials already on file for
      type: "public-key",  //    this user. These are just examples.
      id: new UInt8Array([21, 31, 56, ...]).buffer,
      transports: ["usb", "nfc"]
    }, {
      type: "public-key",
      id: new UInt8Array([21, 31, 56, ...]).buffer,
      transports: ["internal", "ble"]
    }, {
     ...
    }],
    authenticatorSelection: {
      authenticatorAttachment: "cross-platform", //!!!
      // for the 2FA case, leave userVerification unspecified
    },
  }
})
A note on attestation: We recommend that most relying parties not specify the attestation conveyance parameter attestation (thus defaulting to none), or instead explicitly use the value indirect. This guarantees the most streamlined user experience (platforms are likely to obtain consent from the user for other types of attestation conveyances, which likely results in a larger fraction of unsuccessful credential creations due to users canceling the creation).
It is common practice to let the user name the authenticator (either
before or after you call create()), and to show the user a list of
registered authenticators on this page, or a related accounts settings
page, where they can deregister individual authenticators.
4.2 Account Bootstrapping Using a FIDO 2nd-Factor
Once they register a roaming authenticator, users can now secure their bootstrap sign-ins by using this authenticator as a 2nd-factor during sign-in. [12]
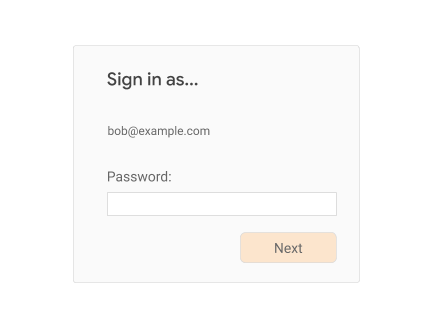
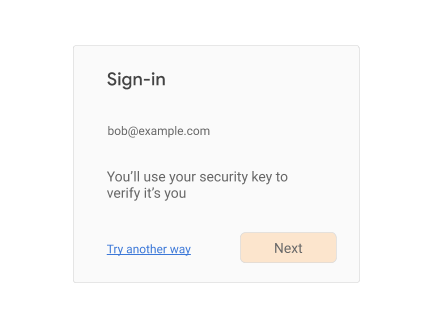
The relying party starts the bootstrap sign-in flow as usual, typically by asking the user for their account identifier (username) [13]:
Once it’s clear who the user is, serve appropriate login challenges to the user. Typically this will include asking the user for a password, but it might not. At some point (perhaps directly after collecting the password), you serve a login challenge for the FIDO 2nd-factor:
When the user clicks on “Next”, call navigator.credentials.get(),
specifying all the credential ids you have on file for this user’s
roaming 2FA authenticators:
navigator.credentials.get({
  publicKey: {
    challenge: ...,
    rpId: ...,
    allowCredentials: [{ //!!! make sure you specify these
      type: "public-key",
      id: new UInt8Array([21, 31, 56, ...]).buffer,
      transports: ["usb", "nfc"]
    }, {
      type: "public-key",
      id: new UInt8Array([21, 31, 56, ...]).buffer,
      transports: ["internal", "ble"]
    }, {
    ...
    }],
    //!!! no need to specify userVerification parameter
  }
})
Note that the browser or platform OS will prompt the user at this point to use their security key. Here is an example of what this might look like in Chrome on Linux:
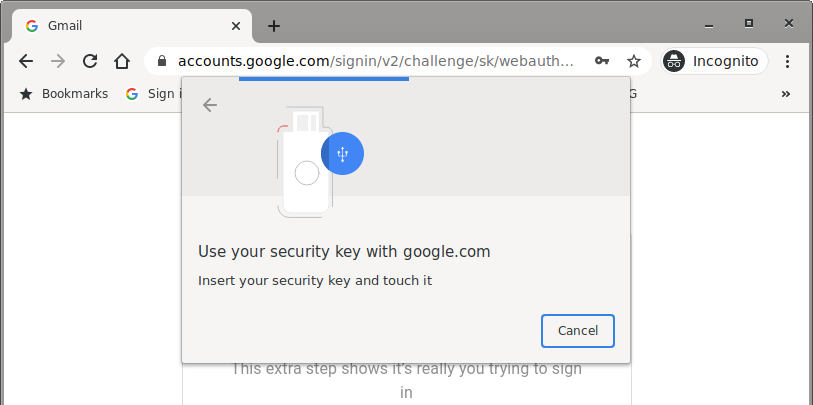
Upon touching their authenticator, you will receive a PublicKeyCredential object containing a AuthenticatorAssertionResponse which you need to successfully verify before considering the user authenticated and signed-in.
5 User-Verifying Roaming Authenticators (UVRAs)
Note that in what we’ve discussed so far, the user would have to use another authentication method - such as a password - to bootstrap the account on a device before they can opt into FIDO-based reauthentication; and they also would typically use another authentication method - such as a password - in conjunction with a roaming FIDO authenticator to implement phishing-resistant 2FA.
User-verifying roaming authenticators (UVRA) unlock truly FIDO-only/passwordless use cases, such as single-step account bootstrapping. A UVRA inherently meets the 2FA security bar, since it represents something the user has (the authenticator), and it will also verify something the user knows or is (PIN or biometric). In fact, like any type of FIDO authentication, UVRAs provide phishing resistance, thus exceeding the security level of many other forms of 2FA. Login flows built around UVRAs are therefore suitable not just for the general population, but even for high-security users such as 2FA users.
Yet, the user experience is that of a single-step sign-in: the user simply uses the authenticator to bootstrap their account on another device, without needing to also provide a password or passing other login challenges on that device [14].
5.1 Registering a UVRA / Opting into FIDO-only Flows
Note that one important class of UVRAs are mobile phones, which we’ll handle in more detail below. This section deals with other forms of UVRAs (such as special-purpose hardware tokens with PIN protection or a fingerprint scanner), or with relying parties that don’t wish to take advantage of the more streamlined user experience that are possible when using a phone as a UVRA.
Users need to set up their UVRA so it can be used in a FIDO-only/passwordless login flow. We recommend that relying parties do this outside of the normal login flow, unless the relying party knows that the user is in possession of a UVRA device (in which case registering the UVRA can be done as part of the login flow). For most consumer use cases, the relying party won’t know whether the user possesses a UVRA, and therefore should promote the use of UVRAs to users outside of the login flow. For the purpose of this guide, we assume that the relying party has somehow advertised its support of UVRAs, and is suggesting that users possessing a UVRA device go to a registration page that might look like this:
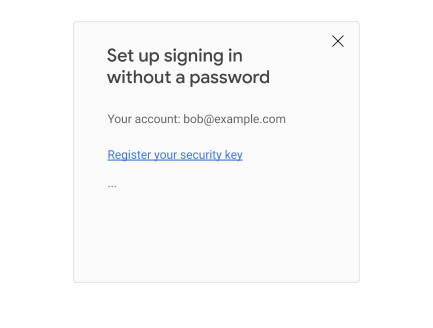
When the user clicks on “Register your security key”, you call
navigator.credentials.create(), taking care to specify “cross-platform”
for the attachment type, requiring user verification, and requiring a
resident (aka discoverable) key [15]. You also want to look up any
existing credential ids for UVRAs already registered for the current
user (you can ignore credential ids for platform authenticators and 2FA
authenticators), and specify those in the exclude-list, thus making sure
that a user doesn’t register the same authenticator twice:
navigator.credentials.create({
  publicKey: {
    rp: {...},
    user: {...},
    challenge: ...,
    pubKeyCredParams: {
      type: "public-key",
      alg: -7
    },
    excludeCredentials: [{ //!!! UVRAs already on file for
      type: "public-key",  //    this user. These are examples.
      id: new UInt8Array([21, 31, 56, ...]).buffer,
      transports: ["usb", "nfc"]
    }, {
      type: "public-key",
      id: new UInt8Array([21, 31, 56, ...]).buffer,
      transports: ["internal", "ble"]
    }, {
     ...
    }],
    authenticatorSelection: {
      authenticatorAttachment: "cross-platform", //!!!
      requireResidentKey: true,                  //!!!
      userVerification: "required"               //!!!
    },
  }
})
A note on attestation: We recommend that most relying parties not specify the attestation conveyance parameter
attestation(thus defaulting to none), or instead explicitly use the valueindirect. This guarantees the most streamlined user experience (platforms are likely to obtain consent from the user for other types of attestation conveyances, which likely results in a larger fraction of unsuccessful credential creations due to users canceling the creation).
You should let the user name the authenticator (either before or after you call create()), and show the user a list of UVRAs that they have registered on this or a related accounts settings page.
5.2 Registering a Phone as a UVRA
Technically speaking, phones can be registered the same way as other UVRAs. The browser or platform that is providing the webauthn API will typically provide a way for the phone and browser to directly connect wirelessly, so that a FIDO credential can be generated as just described.
There is, however, a better way: relying parties have the opportunity to register the phone as a UVRA if and when the user is interacting with a mobile app belonging to the relying party, or by visiting the relying party’s website on the phone. We call this on-device registration.
On-device registration for using the phone as a UVRA is very similar to opting the user into FIDO-based reauthentication on the phone. In fact, we recommend that the relying party re-use the same moment - during account bootstrapping of the account on the phone and after checking that a user-verifying platform authenticator exists - to opt the user both into FIDO-based reauthentication on the phone, and into using the phone as a UVRA:
We recall the recommended steps during an account bootstrap. First, after the user is authenticated, make a call to
PublicKeyCredential.isUserVerifyingPlatformAuthenticatorAvailable()
If that call returns true, you can prompt the user to opt into FIDO-based reauthentication. If the user is on a platform that can be used as a UVRA, you can also tell them about passwordless functionality:
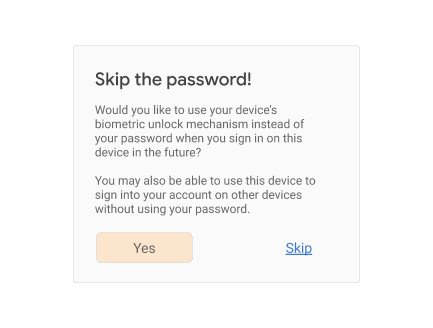
Consider showing (or linking to) longer descriptions explaining that all users that are able to unlock the current device will be able to access the account (and to bootstrap it on new devices), in order to ensure that the user is giving informed consent.
Note: One issue here is that you won’t know whether the underlying platform supports UVRA functionality (i.e., if it’s really a mobile phone) until you receive the registration response and inspect the indicated transports, especially since browsers are moving to a model where user-agent strings are becoming less and less revealing about the user’s device type. We therefore recommend using language like shown above implying that this UVRA functionality may or may not work.
If the user consents, call navigator.credentials.create(), making sure to ask for a platform authenticator, user verification, and a resident (discoverable) key:
navigator.credentials.create({
  publicKey: {
    rp: {...},
    user: {...},
    challenge: ...,
    pubKeyCredParams: {
      type: "public-key",
      alg: -7
    },
    authenticatorSelection: {
      authenticatorAttachment: "platform", //!!!
      requireResidentKey: true,            //!!!
      userVerification: "required"         //!!!
    },
  }
})
A note on attestation: We recommend that most relying parties not specify the attestation conveyance parameter
attestation(thus defaulting to none), or instead explicitly use the valueindirect. This guarantees the most streamlined user experience (platforms are likely to obtain consent from the user for other types of attestation conveyances, which likely results in a larger fraction of unsuccessful credential creations due to users canceling the creation).
If the transports indicated in the response include “ble” and/or “cable”, you know that the present device can be used as a UVRA. Register the returned credential id both as a credential id for reauthentication as well as a UVRA for this user. You might want to tell the user about this:
If the transports indicated in the response only include “internal”, but not “ble” and/or “cable”, the user can still use this platform authenticator for FIDO-based reauthentication on this phone, but will have to use other mechanisms to bootstrap their account on other devices. You might want to inform the user about this:
If the response indicates that the device cannot be used as a UVRA, register the returned credential id just as a credential id for reauthentication.
If the user registers their phone as a UVRA this way, consider creating a page in your account settings that shows the user a list of their registered UVRAs, and allow for deregistering them. There is no need to let the user name their UVRA if it’s a phone - you can instead refer to it by its model name.
5.3 Signing in with a UVRA
If you have users amongst your user population that have UVRAs (either
UVRA Security Keys, or UVRA-phones), then you can offer a
FIDO-only/passwordless bootstrap sign-in flow. This boils down to
calling navigator.credentials.get() with an empty allow-list during
account bootstrap. At some point, when most of your users use UVRAs, you
might consider making this the default login flow (with legacy methods
such as passwords being used as fallbacks). But for the time being, we
imagine that the FIDO-only login flow will be an advanced option in your
account bootstrap flow, which might be promoted like this:
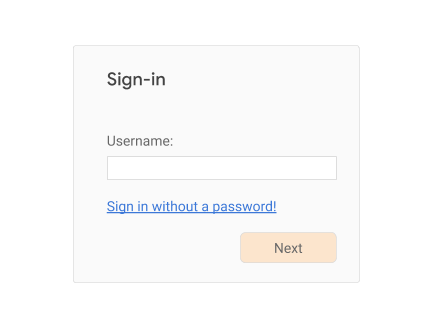
If the user clicks on “Sign in without a password!”, with or without
having supplied a username, call navigator.credentials.get() without an
allow-list, making sure you require user verification:
navigator.credentials.get({
  publicKey: {
    challenge: ...,
    rpId: ...,
    userVerification: "required", //!!!
  }
})
The result will include a credential id and user handle, which you can use to figure out which user just authenticated. If the call fails, make sure you give the user other options to sign into their account, such as password-based flows or flows involving other types of login challenges.
6 Account Recovery / Device Loss
A concern around the use of FIDO authenticators is device loss: what happens when a user loses their FIDO authenticator? How will they be able to get back into (i.e., “recover”) their account? Our general recommendation is to encourage the user to register a second authenticator as backup, but there are a few caveats to consider:
-
If a user’s only registered authenticator is a platform authenticator that is used only for FIDO-based reauthentication, then the user presumably has some other means to perform bootstrap sign-ins. Thus, the user does not necessarily need to register a second authenticator, because the user will not be “locked out” of their account if they lose access to their platform authenticator. By definition, this “re-authentication-only” authenticator is used to simply bypass a different, more onerous login challenge (such as a password) during reauthentication - it must not be used for account bootstrap. Thus, the user will have other means to perform account bootstrap, and if needed, register a new platform authenticator for FIDO-based reauthentication.
-
If the user has roaming authenticators registered that are used during account bootstrap (e.g., as a 2nd factor, or as a UVRA for a single-step account bootstrap), there might still be other ways for the user to bootstrap their account on a new device. For example, the user might be a 2FA user that has both a security key and a HOTP-based 2nd-factor token registered for their account. If this is the case, the loss of the security key still doesn’t mean that the user will have lost access to their account. (Although this also means that the account isn’t getting full phishing-resistant protection.)
This leaves us with a scenario in which the user is a “FIDO-only” user, meaning that they must use a roaming FIDO authenticator during account bootstrap (either a UVRA, or a simpler authenticator suitable as a second factor). In this case the relying party should encourage the user to register a second roaming (cross-platform) authenticator. Do not let the user register a platform authenticator as a backup for a roaming authenticator (and, as we mentioned above, don’t bother registering backups for platform authenticators that are only used for re-authentication).
Allow the registration of the second (backup) authenticator to happen over any authenticated user session: as we noted above, those sessions by definition were bootstrapped by another FIDO authenticator, so the security of the session is sufficient for this registration step.
7 Appendix: More Complex Use Cases
7.1 Phishing-Resistant Account Bootstrapping with Optional Passwordless Sign-In
So far we considered two different ways a relying party can achieve phishing resistance for a user: either ask the user to register a simple (not necessarily user-verifying) roaming authenticator that is then used as a 2nd factor during account bootstrap, or ask the user to register a UVRA, which provides two authentication factors and phishing resistance in single-step account bootstrap flows.
What if the relying party is primarily interested in providing phishing resistant account bootstrap flows to its users, but it wants to be flexible as to whether this happens through a 2nd step (e.g., using a non-user-verifying security key), or whether this happens through the use of a UVRA and single-step account bootstrap? Webauthn implementations compatible with Level 2 of the webauthn specification can support such a scenario. As a result, the relying party can customize the user experience to the individual user: if a user is in possession of a simple (non-user-verifying) roaming authenticator, they can use it to achieve a phishing-resistant account bootstrap, but will have to also type a username and password. But if another user happens to have a more advanced user-verifying roaming authenticator, they will be able to skip the password (and potentially even the username) step during account bootstrap.
The idea is that the relying party will create a credential on a roaming authenticator, while being flexible as to whether that roaming authenticator supports user verification and/or resident (aka discoverable) credentials. If the authenticator supports user verification, the user will be able to skip the password login challenge during account bootstrap. If the authenticator also supports resident/discoverable credentials, the user will in addition be able to skip the identification step (typing the username, email address, or other user identifier). If the authenticator supports neither, then the user can still use the authenticator for a phishing-resistant account bootstrap, but will have to pass additional login challenges first (most likely username + password).
To achieve this, the relying party will not require user verification or a resident/discoverable credential during credential creation. Instead, you will set these to best-effort, or “preferred” mode (a feature only available in Level 2 of the webauthn specification). Note that you also need to set the credProps extension parameter to find out whether or not a resident/discoverable credential was created.
// Note that this example uses features only available
// in Level 2 of the webauthn specification!
// ---------------------------------------------------

navigator.credentials.create({
  publicKey: {
    rp: {...},
    user: {...},
    challenge: ...,
    pubKeyCredParams: {
      type: "public-key",
      alg: -7
    },
    excludeCredentials: [{ //!!! other roaming authnrs already on
      type: "public-key",  //    file for this user
      id: new UInt8Array([21, 31, 56, ...]).buffer,
      transports: ["usb", "nfc"]
    }, {
      type: "public-key",
      id: new UInt8Array([21, 31, 56, ...]).buffer,
      transports: ["internal", "ble"]
    }, {
    ...
    }],
    authenticatorSelection: {
      authenticatorAttachment: "cross-platform", //!!!
      residentKey: "preferred",                  //!!!
      userVerification: "preferred"              //!!!
    },
    extensions: {
      credProps: true,                           //!!!
    },
  }
})
A note on attestation: We recommend that most relying parties not specify the attestation conveyance parameter
attestation( thus defaulting to none), or instead explicitly use the valueindirect. This guarantees the most streamlined user experience (platforms are likely to obtain consent from the user for other types of attestation conveyances, which likely results in a larger fraction of unsuccessful credential creations due to users canceling the creation).
Depending on whether a resident/discoverable credential was in fact created, and whether the authenticator response indicates support for user verification, the relying party can afterwards let the user know what experience they should expect during subsequent account bootstraps, for example by telling them that they can use the “Sign in without a password” feature mentioned in Signing in with a UVRA.
8 Footnotes
-
I.e., without any saved user state or credentials, e.g., cookies or data in local storage containing (at least) the username or other information about the user. Typically, account bootstrapping results in the creation of saved user state on the user’s device, enabling the user to later return via lower-friction flows.
-
Not all FIDO authenticators are user verification-capable, though all FIDO authenticators are at least capable of testing for user presence. The latter is a means of sensing that a user is at least physically present. For example, the blinking button on many security keys is a user presence sensor. Touching it signals a user is present, but does not distinguish among individuals as user verification does. User presence testing is appropriate for multi-step account bootstrapping where users explicitly supply more than one authentication factor, e.g., their security key along with entering a password (i.e., “two-step verification”). However, user verification enables single-step account bootstrapping as well as single-gesture reauthentication, thus reducing user friction.
-
“Single-step” here refers to the fact that the user has to pass only a single login challenge, not to the number of authentication factors. Single-step bootstrapping can be two-factor authentication, e.g., if the user has to confirm sign-in with their biometric (something they are) on their phone (something they have).
-
This combination is mostly applicable in enterprises that require frequent malware-resistant credential refreshes, but is not covered in this guide.
-
This use case is not covered in this guide.
-
Although there are options to skip this step, which themselves use FIDO/webauthn APIs and UVRAs. We’ll discuss those in Signing-in with a UVRA.
-
Although there are exceptions: for example, in an enterprise context, users may not be able to create accounts themselves, and instead need to rely on some other process to have the account created for them.
-
We recommend that on this login challenge page, users can’t change their account identifier. Also, the login challenge should be something that an unauthorized user of the device can’t pass.
-
Note that a relying party may choose to treat signing-out as a comprehensive action and thus delete all references to the user’s credential id (if it has any). Such a relying party ought to treat a subsequent sign-in like an account bootstrap, and repeat the steps explained above in Authenticating the User and Opting into FIDO-based Reauthentication at the time of the next sign-in.
-
We’ll discuss the use of user-verifying roaming authenticators for single-step account bootstrapping in Section 5.
-
I.e., where all users need to register some form of 2nd factor during account creation or during their first sign-in.
-
We do not recommend that relying parties require a second factor during reauthentication. Instead, you should see whether the user’s platform features a user-verifying FIDO platform authenticator, and employ it, making reauthentication more user-friendly without sacrificing security.
-
There are ways to skip this step, which themselves use FIDO/webauthn APIs. We’ll discuss those below.
-
Though, depending upon the type of authenticator, they may need to provide a PIN (which is locally processed by the platform OS and authenticator).
-
Historically, we used the term “resident key” to refer to what will be known as “discoverable credentials” in the upcoming WebAuthn L2 and CTAP2.1 specs.